
Flask is one of my favorite frameworks. I love it maybe the most (Maybe because I love Python). It is light and simple, but very powerful. It is perfect for any type of project. From a project prototype to API service, and also large projects.
But the Flask characteristic that I love the most is Freedom
Flask does not have any predefined project structure or configs. You can literally design your application in whatever way you want.
Although this freedom is wonderful, it may create a specific disadvantage: How can I initiate my Flask project? A situation that many people who first start a Flask app face that makes them a bit confused.
In this post, I will explain how I usually initiate my Flask projects.
Remember: You have freedom in Flask. This post is only my personal approach.
Let’s Start
The first step is to create a project directory for our new application. We name our project flask-cool-app
:~$ mkdir flask-cool-appThe next step is common for all Python applications: create Python virtual environment
Inside the application directory, run:
:~$ python -m venv .venvThe name of the virtual env directory is .venv
Now we need to enable it. Run (Linux):
:~$ source .venv/bin/activateFlask is a Python library. So we need to install it.
Run:
(.venv):~$ pip install flask Important Note: After this step, you can run the “flask init” command to initiate a basic project template. However, here we want to do it from scratch with freedom!
Application Factory
In Flask, applications are Python packages. So the first step to creating our application is to make a directory. Our application name is best_app. Inside the flask-cool-app directory run:
:~$  cd /path_to/flask-cool-app
:~$  mkdir best_app
Now inside the best_app, create __init__.py to make the best_app a package.
This init script also has another usage for us: application factory
This script will contain a function name create_app() that initiates our application and make it ready to serve.
Inside the __init__.py add this code:
from flask import Flask

def create_app():
    app = Flask(__name__)
    app.config.from_mapping(
        SECRET_KEY = "My_Secret_Key"
    )

return app**Note**: Remember to use an actual SECRET_KEY and never share it with anybody!
Nice! Now we have our application ready!
Now if you run these commands, you can see that your application is accessible on http://localhost:5000
:~$  cd /path_to/flask-cool-app
:~$  export FLASK_APP=best_app
:~$  flask run
Modules
In a Flask application (package), you can have multiple modules. These modules can perform different aspects of your application such as Auth module to handle authentication. Generally, dividing your application into some small modules helps to:
- Separation of concern. Make it easier to maintain
- Disable/Enable some features without affecting the others
- Let others write modules to add functionality to the application without worrying about changing the core modules.
In this post, our project will have two modules: Hello and Goodbye
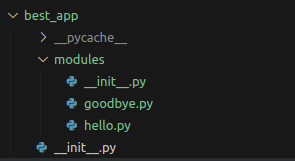
Inside the best_app create a new directory name modules
:~$  cd /path_to/flask-cool-app/best_app
:~$  mkdir modules
Now inside this modules directory, create three scripts:
- __init__.py : to make the modules importable like a package. Will be empty.
- hello.py : The first module
- goodbye.py : The second module
So the structure will be like this:
Now let’s write the “hello” module.
hello.py
from flask import Blueprint

blueprint = Blueprint('hello', __name__, url_prefix='/hello')

@blueprint.route("/say", methods=["GET"])
def say_hello():
    return "Hello!"
and, goodbye.py:
from flask import Blueprint

blueprint = Blueprint('bye', __name__, url_prefix='/bye')

@blueprint.route("/say", methods=["GET"])
def say_bye():
return "Goodbye!"Notes:
- Each module has a function to say Hello and Goodbye
- Both of the use Blueprint. The advantage of defining a blueprint is that we can completely separate the URL config for our modules. As you see both of them have the same route “/say” but this makes no conflict since they are registering themselves with different blueprints.
The next step is that we need to register our modules when creating the application. Here is the added part in the create_app() function in our application factory (__init__.py)
from flask import Flask
from best_app.modules import hello, goodbye

def create_app():
    app = Flask(__name__)
    app.config.from_mapping(
        SECRET_KEY = "My_Secret_Key"
    )

    app.register_blueprint(hello.blueprint)
    app.register_blueprint(goodbye.blueprint)

    return app
Now re-run the Flask Dev server. After this, you can call the modules’ functions like:
- http://localhost:5000/hello/say
- http://localhost:5000/bye/say
Load config variables
The last step for this post is to define the config for our application. Configs variable can help us to prepare our app for different setups and also let others customize it if needed.
To define config, we create a new Python file name config.py in the best_app directory
class CoolConfig(object):

    MY_ENV_VAR = "XY"
This config loads the needed variable for us.
Now we need to load this config in our application factory function (__init__.py)
from flask import Flask
from best_app.modules import hello, goodbye
from best_app.config import CoolConfig

def create_app():
    app = Flask(__name__)
    app.config.from_mapping(
        SECRET_KEY = "My_Secret_Key"
    )

    app.config.from_object(CoolConfig)

    app.register_blueprint(hello.blueprint)
    app.register_blueprint(goodbye.blueprint)

    return app
Let’s use it! we change the say_hello() function in the Hello module to this:
from flask import current_app

@blueprint.route("/say", methods=["GET"])
def say_hello():
    return "Hello {}!".format(current_app.config.get('MY_ENV_VAR'))
Now, if you call http://localhost:5000/hello/say, you will see the message “Hello XY!” (remember to re-run the dev server)
Note: As an alternative approach, You can also use a .env file to load the environment variables.
Congrats! We initiated our Flask app!
In the future, I will do my best to explain further steps such as Database configuration, models, and dockerizing the Flask app. Let’s see!
This is the link to the source code on my GitHub: https://github.com/Pooya-Oladazimi/flask-cool-app
The End.
2 thoughts on “Flask App Development 101: Kickstarting Your Own Web App Adventure”
Comments are closed.